Overview
Spendflo seamlessly integrates with Atlassian, offering you a comprehensive view of license usage, empowering you with de-provisioning features, and facilitating access cost management—all conveniently within the Spendflo app. With Spendflo, you can exercise complete control over your Jira and other , all from a single, unified platform.
Pre-requisites
1. To be able to use this integration, you need to be an admin within your Atlassian Cloud account
2. To be able to access & manage your users, you must verify the domain. Here is a Atlassian Access - Domain Verification article on how to verify domains.
3. If you have more than 1 domain (for eg. xyz.org, xyz.net, xyz.com) , it's important to verify all domains following the steps here.
Limitations and Integration Order
- Reclaim Feature in Atlassian Integration: The reclaim feature is not available exclusively with the Atlassian integration. However, when Jira/Confluence is integrated alongside Atlassian, the reclaim feature becomes available.
- Dependency on Atlassian Integration: When you remove the Atlassian integration, both Jira and Confluence integrations will also be removed. Jira/Confluence cannot function as standalone integrations; the presence of the Atlassian integration is necessary.
- Spendflo does not support the Atlassian accounts using the “original user management experience” (depreciated)
Integration Order Guidelines
To ensure a seamless integration experience, follow these guidelines:
- Atlassian Integration: Initiate the integration process by connecting Atlassian first.
- Jira/Confluence/Trello Integration: After successfully integrating Atlassian, proceed to connect Jira or Confluence or Trello.
Reclaim Feature Details
- Enabling the Reclaim Button: The reclaim button will only be enabled after connecting Jira and Confluence.
- Sync Time After Connection: After connecting Jira and Confluence, it takes approximately 15-20 minutes for user sync to occur.
- Access Groups and Reclaim Process: Upon clicking the reclaim button (specific to Atlassian), a slider will open, displaying the list of access groups. These groups may not necessarily be the ones the tool belongs to but include all groups the user is a part of.
- Reclaim Process with Bitbucket: In Bitbucket, we can create a workspace in 2 ways, either through Atlassian admin or with Bitbucket directly:
- For workspaces created in Atlassian admin, we can deprovision users by clicking on the reclaim button and selecting the access groups that have the Bitbucket accounts.
- For workspaces created directly on Bitbucket, Bitbucket only allows the users to be deleted from the screen and not from external apps like spendflo.

Selecting and reclaiming triggers a sync, and the user must wait for 15-20 minutes to see the changes take effect.
Steps to Install the Integration
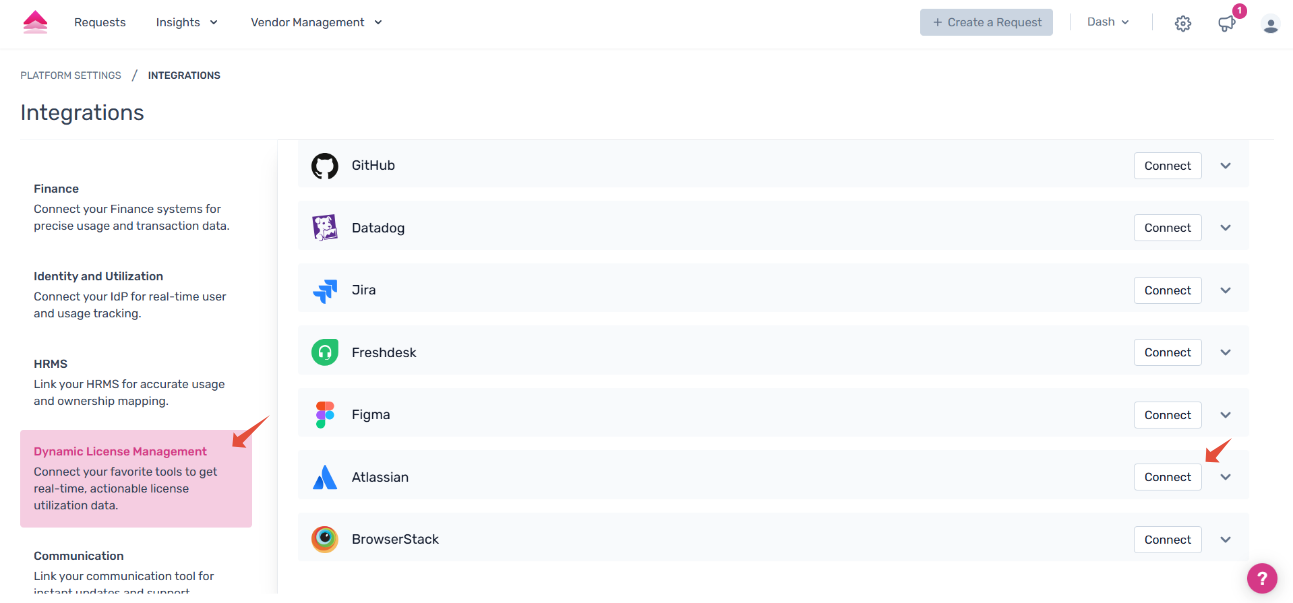
1. Go to Settings >Platform Settings > Integration> Dynamic License Management or search for Atlassian

2. Find Atlassian under 'Dynamic License Management' & click 'Connect' to start the integration

3. You'll now be prompted to add the API Key and Organization ID.

4. To find the API Key and Organization ID. Sign in to your Atlassian account and go to Settings.'Click on settings'

5. Under Settings, click on API keys.'Click on api keys'

6. Now click on Create API key and enter Name and Expires on for API key.'Click on Create API key'

7. Now click on Create. Ensure to choose option to create without scopes.


8. Copy Organization ID and API key values.

9. Paste it in Spendflo Integration page and click "Connect".

10. Your integration is now successful. Your data will now start populating on the License page

Was this article helpful?
That’s Great!
Thank you for your feedback
Sorry! We couldn't be helpful
Thank you for your feedback
Feedback sent
We appreciate your effort and will try to fix the article